Using Your Smart Phone as a Webcam
When using Zoom or recording lecture videos from home, you may need to use a web camera. If you are using an older computer that doesn't have one built in you may think you need to buy one. But why spend money for a separate webcam when you can easily use your smart phone's camera as a webcam?
Using an Android Phone as a Webcam
1. On you Android phone download (Play Store) and install the program DroidCam Webcam & OBS Camera

2. This can be connected to your computer either by USB or WIFI.
Note: your phone and PC must be on the same internet network. Connecting through WIFI, eliminates the need to connect your phone to your computer using a USB cable
3. Next download the Windows Client program on to your computer. You can find this at www.dev47apps.com/droidcam/windows
4. Once both are installed, start the programs on the PC and your Android phone. It doesn’t matter with order.
5. Click “ALLOW” on the android phone to “Allow DroidCam to take pictures and record video?”
6. Click “ALLOW” on the android phone to “Allow DroidCam to record audio”.
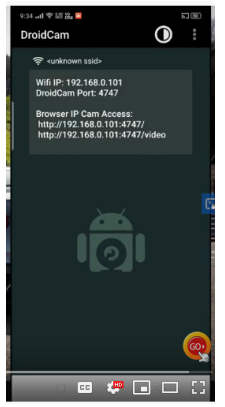
7. There should be a screen on the Android phone showing the phone’s Wifi IP address and DroidCam Port:
8. Now Launch the dev47apps PC Client program on you computer .
9. If you are going to use the Wifi then click the Wifi Icon.
10. In the box labeled Device IP: enter you IP address from the phone that is displayed.
11. The port number should be the same but if not also enter this DroidCam Port number.
12. Put a checkmark in the boxed “Video” and “Audio”.
13. Click the “Start” button on the DroidCam Client program.
14. Your video should now show up on the DroidCam Client program.
15. There are buttons on the DroidCam Client program below where it says “DroidCamX Pro Controls”. These only work if you BUY the PRO Version.
16. Which means you cannot rotate the screen if it should show up sideways. The only options you have it to turn you phone sideways and all will work fine.
17. If you start Zoom and click on the UP arrow next to the “Start/Stop Video” button there should be a “DroidCam 3” and/or a “DroidCam 2” icon. Select the one that works with your phone and your picture should show up on the Zoom window.
NOTE: If your phone has selected the wrong camera … say the back camera and not the selfie camera” then there is a fix.
a. Stop the DroidCam Client program on your computer.
b. Now pick up your Android phone and look for the 3 dots in the upper right hand corner and click/press on them and select “Settings”
c. Click on “Camera” and you should get 4 different selections for cameras (2 – Front and 2 – Back)
d. Now when you Start up the Windows DroidCam Client program you should have the correct camera you showing.
18. Now select the UP arrow next to the “Mute/Unmute Audio” button. There should be a selection called “Microphone (Droid Virtual Audio)". This will use the microphone on you Android phone.
For additional support, visit UHD TTLC Support or, contact us at: TTLCHelp@uhd.edu