Best Practices for Securing Your Virtual Classroom
Steps to Secure Your Virtual Zoom Classroom
To prevent unwanted or random people in your meeting follow these 11 steps.
Step 1: Update Your Zoom Application
It's important that you're running the most recent version of Zoom. This ensures that you have the most updated controls when hosting or joining a meeting. Zoom also includes many security fixes in these patches.
Step 2: Allow Only Authenticated Users to Join Your Meetings
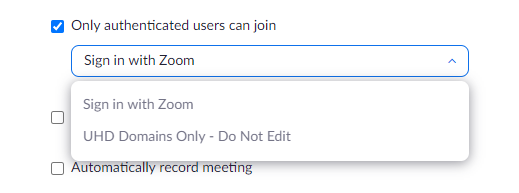
When scheduling your meetings, you have the option to turn on “Authenticated Users only” as part of your security settings. UHD now offers 3 levels of authentication:
-
No Authentication – all users are able to join your meeting regardless of if they are logged into a Zoom account or not
-
Only Authenticated Users Can Join (Sign in with Zoom) – any user logged into a Zoom account can access your meetings – this does NOT have to be an UHD account
-
Only Authenticated Users Can Join (UHD Domains Only) – only users logged into UHD accounts may access your meetings
Choosing the right level of authentication is determined by who you are expecting in your meeting. Public meetings may have no authentication, but class meetings would benefit from having Only Authenticated Users Can Join (UHD Domains Only) turned on.
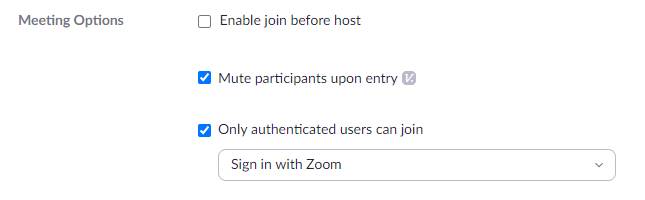
You can find this feature in any Scheduled Meeting under Advanced Options:

Step 3: Use Random Meeting ID’s and Random Passcodes for Each Class and Share Your Links Privately
Use an Automatically Generated Meeting ID: It’s best practice to generate a random meeting ID for your class, so it can’t be shared multiple times. This is the better alternative to using your Personal Meeting ID, which is not advised because it’s basically an ongoing meeting that’s always running.

Setting a Passcode: Your UHD password protects your account. Passcodes protect the classroom. Create a passcode and share with your students via school email so only those intended to join can access a virtual classroom. Using a randomly generated passcode improves this security.

Share Links Privately
Privately sharing the meeting with your students via UHD Gatormail or Canvas is a good way to ensure the link isn't publicly available. Avoid sharing the link via social media sites or publicly available areas.
Meeting Security When Scheduling Via Outlook
If you add or create a Zoom meeting using Outlook, note that the calendar entry may include the meeting password. If your calendar is viewable by others, we recommend making the meeting entry private or editing the details to remove the password.
https://support.zoom.us/hc/en-us/articles/115005223126-Zoom-for-Outlook-add-in-web-and-desktop-
Step 4: Ensure 'Join Before Host' is Turned Off
While scheduling a meeting, under Meeting Options, ensure that the 'Join Before Host' toggle is turned OFF. The 'Join Before Host' option can be convenient for allowing attendees to carry on with a meeting the host is not able to start.
However, with this option enabled, the first attendee who joins the meeting will be made the host automatically with full control over the meeting. If you are scheduling a meeting where sensitive information will be discussed, we recommend leaving this option disabled.
https://support.zoom.us/hc/en-us/articles/202828525-Join-before-host
Step 5: Control Screen Sharing
To give instructors more control over what students are seeing and prevent them from sharing random content, sharing privileges are now set to “Host Only” by default so instructors are the only ones who can share content in class.
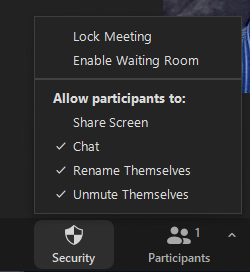
However, if students need to share their work with the group, you can allow screen sharing in the host controls. Click on the Security shield icon in the toolbar and check the box next to Participants in the “Who can Share?” menu. This will grant participants the ability to share screen during this individual meeting.
https://support.zoom.us/hc/en-us/articles/201362603-Host-and-co-host-controls-in-a-meeting
NOTE: If you force a participant to stop sharing their web cam, they won't be able to share their web cam feed again until you click 'More' and 'Ask to Start Video'. However, if you force a participant to stop sharing their screen, they can re-share their screen immediately unless you deactivate participant sharing.
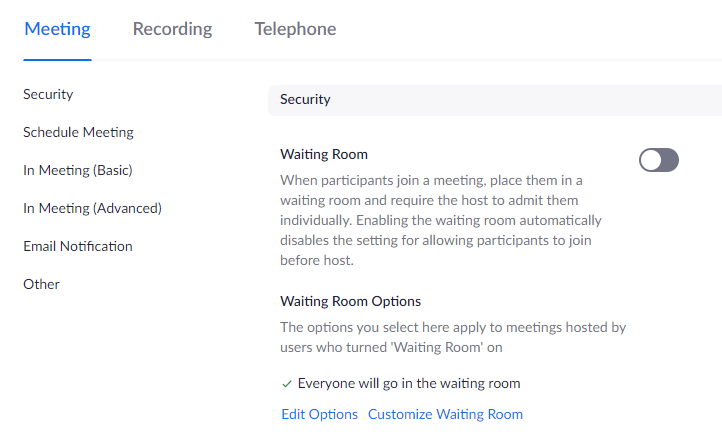
Step 6: Enable the Waiting Room
https://support.zoom.us/hc/en-us/articles/115000332726-Waiting-Room
The Waiting Room feature is one of the best ways to protect your Zoom virtual classroom and keep out those who aren’t supposed to be there. When enabled, you have two options for who hits the Waiting Room before entering a class:
-
The “All Participants” will send everyone to the virtual waiting area, where you can admit them individually or all at once.
-
“Guest Participants Only” allows known students to skip the Waiting Room and join but sends anyone not signed in/part of your school (depending on Authentication settings) into the virtual waiting area.

The virtual Waiting Room can be enabled for every class (in your settings at uhd.zoom.us) or for individual classes at the scheduling level.

Step 7: Lock Your Meeting Room
Using Zoom Host Controls, you can lock a meeting once all attendees have joined. When a meeting is locked, no one can join, and the host will not be alerted if anyone tries to join.
https://support.zoom.us/hc/en-us/articles/360041848151-In-meeting-security-options
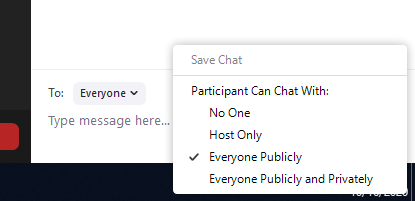
Step 8: Lock Down the Chat
Instructors can restrict the in-class chat so students cannot privately message other students. We recommend controlling chat access in your in-meeting toolbar controls (rather than disabling it altogether) so students can still interact with the teacher as needed. Chat controls in the meeting are located in the bottom right hand corner of the Chat window.
How to control chat access: https://support.zoom.us/hc/en-us/articles/115004809306-Controlling-and-Disabling-In-Meeting-Chat
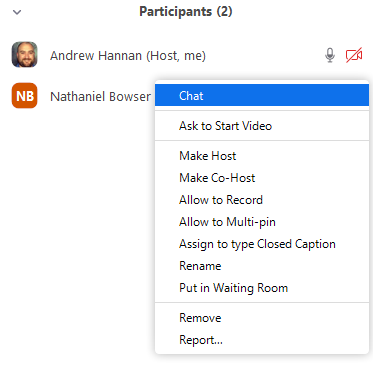
Step 9: Remove a Participant
If you have already begun a session with an unwanted guest, you can mute them and then remove them from the meeting. In the PARTICIPANTS menu HOVER over their name, and the REMOVE option (among other options) will appear. Click to remove them from your virtual classroom, and they won’t be allowed back in. Keep in mind that people removed from a meeting are permanently blocked from rejoining any future meetings unless you remove them from your blocked list.
https://support.zoom.us/hc/en-us/articles/360041848151-In-meeting-security-options
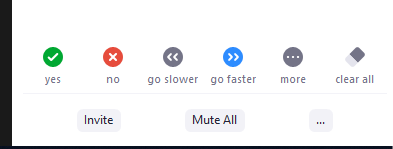
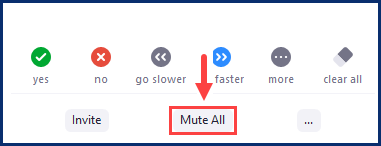
Step 10: Mute All Participants
When scheduling a meeting you have the option to mute participants as they enter the meeting. You also have the option in your meeting controls to disable participants ability to unmute themselves. As the host you can still toggle someone to unmuted if they ask for permission to speak, but this ability can be put to great use to make sure that only the intended speaker gains access to their microphone.
https://support.zoom.us/hc/en-us/articles/203435537-Muting-and-unmuting-participants-in-a-meeting
Step 11: Share This Article
Sharing this information with others helps to decrease the likelihood that you will encounter security related issues with your Zoom meetings.
For additional support, please contact UHD Canvas Support at (713) 221-2786 or by Email TTLCHelp@uhd.edu.