Microsoft 365: Create and Sharing Folders
Overview
When using Microsoft 365, users are able to create and share folders. This document outlines how to create a folder and share the folder through a link.
Create folders
1. Go to the OneDrive website and sign in with your UHD Microsoft account.
2. Select New > Folder.
3. Type a name for the folder and select Create.
4. Select the files you want and drag them into the folder.
Share with a "Copy Link"
Choose this option to share items with lots of people you might not even know personally. For example, you can use these links to post to Facebook, Twitter, or LinkedIn, or share in an email or message. Anyone who gets the link can view or edit the item, depending on the permission you set.
1. Go to the OneDrive website and sign in with your UHD Microsoft account.
2. Pick the files or folders you want to share by selecting its circle icon.
Note: Sharing multiple items at the same time is not available for OneDrive for work or school accounts.
- If you're using List view, select the circle on the left side of the item. You can also pick multiple items to share them together.
- If you're using Tiles view, select the circle in the top right corner of the item. You can also pick multiple items to share them together.
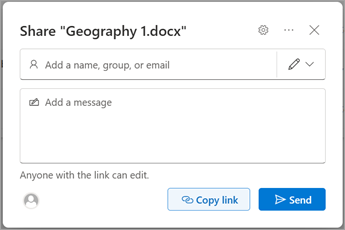
3. Select Share  at the top of the page.
![]()
4. Select Copy Link to copy the link.
5. To change the link permissions, select settings:
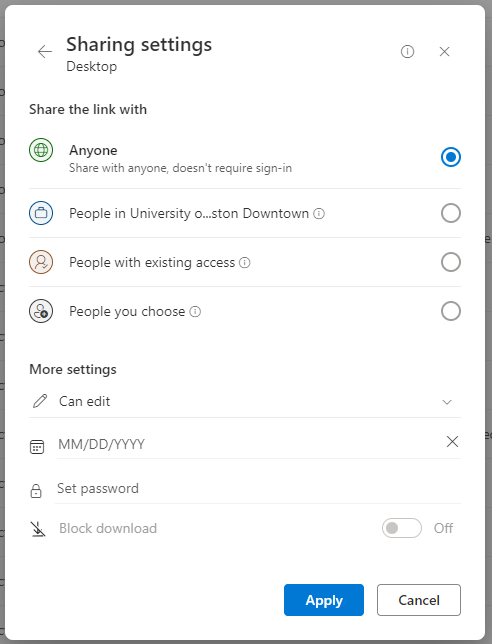
- Anyone gives access to anyone who receives this link, whether they receive it directly from you or forwarded from someone else. This may include people outside of your organization.
- People in <Your Organization> with the link gives anyone in your organization who has the link access to the file, whether they receive it directly from you or forwarded from someone else.
- People with existing access can be used by people who already have access to the document or folder. It does not change any permissions. Use this if you just want to send a link to somebody who already has access.
- Specific people gives access only to the people you specify, although other people may already have access. If people forward the sharing invitation, only people who already have access to the item will be able to use the link.
Once you have set all your link settings and permissions, select Apply.
6. Select Copy. Paste the link and send the link where you want to send it, like an email, message, or post.
For additional support, email us at ttlchelp@uhd.edu